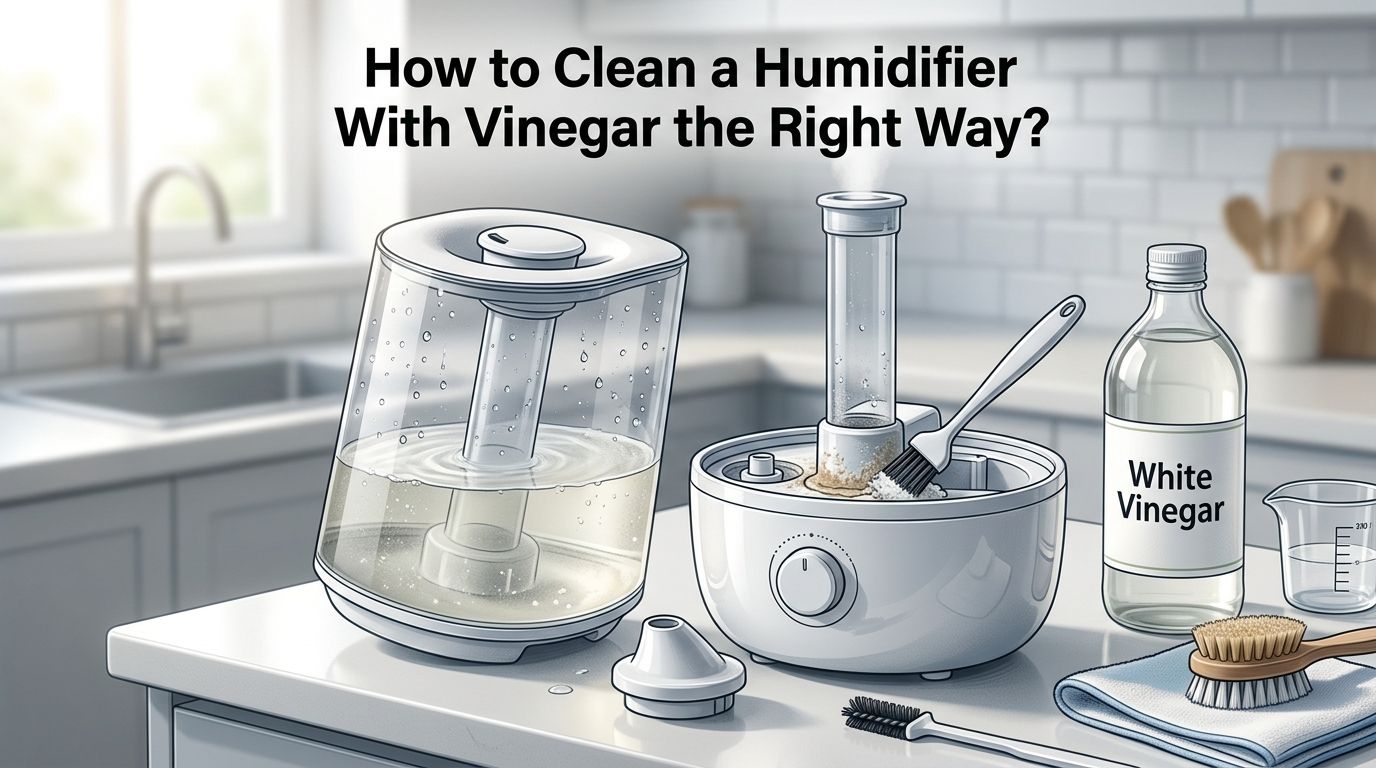
How to Clean a Humidifier With Vinegar the Right Way?
A dirty humidifier does more harm than good. Instead of adding healthy moisture to your air, it sprays bacteria, mold spores, and mineral dust into every breath you take.
The U.S. Consumer Product Safety Commission warns that breathing dirty mist can cause flu like symptoms, lung inflammation, and serious respiratory infections. Children, allergy sufferers, and asthma patients face even greater risk.
The good news? White vinegar is one of the safest, cheapest, and most effective ways to clean your humidifier at home. You do not need harsh chemicals or expensive cleaning solutions.
In a Nutshell
- White vinegar (5% acidity) dissolves mineral deposits and kills most mold and bacteria. It is a natural, non toxic cleaning agent that is safe for all common humidifier types, including cool mist, warm mist, and ultrasonic models. You can find it in any grocery store for very little money.
- You should deep clean your humidifier with vinegar every three days during regular use. The Mayo Clinic recommends this frequency to prevent harmful microorganisms from building up. At the very least, empty and rinse the water tank daily if you run the unit continuously.
- Never run vinegar through a powered on humidifier. The acidity can damage heating elements, internal sensors, and electronic components. Always unplug the unit first and soak the parts instead of running the solution through the machine.
- Pair vinegar cleaning with a disinfecting step using hydrogen peroxide or dilute bleach for the best results. Vinegar excels at removing mineral scale, but a 3% hydrogen peroxide rinse or a teaspoon of bleach per gallon of water provides stronger germ killing power for monthly deep sanitizing.
- Use distilled water in your humidifier after cleaning to slow down future mineral buildup. Tap water contains calcium, magnesium, and other minerals that create white dust and hard crusty deposits inside the tank and base. Distilled water greatly reduces this problem.
- Always let every part air dry completely before reassembling. Moisture left behind creates the perfect environment for mold and bacteria to return within hours.
How to Know When Your Humidifier Needs Cleaning
Your humidifier gives clear signals when it is overdue for a cleaning. A slimy or sticky film on the inside of the water tank is the most obvious sign. This biofilm is a colony of bacteria and mold growing in standing water.
Look for white, crusty deposits around the base, on the heating element, or inside the tank. These are mineral scale buildups from tap water. They reduce your humidifier’s output and can clog the misting mechanism.
A musty or sour smell coming from the mist is another warning. If the air coming out of your humidifier smells bad, you are breathing contaminated vapor. Discolored water or visible dark spots inside the unit also point to mold growth. Do not ignore these signs. Clean your humidifier right away to protect your indoor air quality.
How to Gather the Right Supplies Before You Start
Before you begin cleaning, collect everything you need so the process goes smoothly. You will need distilled white vinegar with 5% acidity, which is the standard type sold at grocery stores.
Grab a soft bristle brush or an old toothbrush for scrubbing tight spots. A clean sponge or cloth works well for wiping larger surfaces. You will also need clean, warm water for rinsing.
If you plan to disinfect after descaling, have 3% hydrogen peroxide ready. A measuring cup or tablespoon is helpful for getting the right ratios. Lay down a towel or work over a sink to catch spills.
Do not use abrasive scrubbers, steel wool, or harsh chemical cleaners. These can scratch the interior surfaces of your humidifier, creating tiny grooves where bacteria can hide and multiply.
How to Safely Disassemble Your Humidifier for Cleaning
Start by unplugging the humidifier from the electrical outlet. This is a critical safety step. Never attempt to clean any appliance while it is connected to power.
Remove the water tank from the base. Pour out any remaining water. Take off the mist nozzle, any filters, and any removable trays or chambers. Check your owner’s manual for model specific disassembly instructions, because some units have parts that should not be submerged in liquid.
Place each piece on a clean towel near your sink. Keeping parts organized makes reassembly easier. Note which parts are electrical and which are water safe. The base of many humidifiers contains electrical components that should never be fully submerged. Only fill the base with liquid to the level recommended by the manufacturer.
How to Clean the Humidifier Base With Vinegar
Pour undiluted white vinegar into the base of the humidifier. Add enough to fully cover the heating element or ultrasonic disc. For most units, one to two cups of straight vinegar will do the job.
Let the vinegar sit for at least 20 to 30 minutes. This soaking time allows the acetic acid to dissolve mineral scale and break apart biofilm. For heavy buildup, you can extend the soak to one hour.
After soaking, use a soft brush or toothbrush to gently scrub the base interior. Pay special attention to corners, crevices, and the area around the heating element or disc. These spots collect the most grime.
Pour out the vinegar and rinse the base thoroughly with clean water. Repeat the rinse two or three times to remove all vinegar residue and loosened deposits. Leftover vinegar can leave a strong smell in your mist if not rinsed well.
How to Clean the Water Tank With a Vinegar Solution
Fill the water tank with a mixture of one cup of white vinegar and one cup of warm water. If your tank is large, scale up the ratio but keep it at roughly 50/50.
Cap the tank and shake it vigorously for about 30 seconds. This swirls the solution across all interior surfaces. Then set the tank down and let it soak for 20 to 30 minutes.
After soaking, use a soft sponge or bottle brush to scrub the inside walls. Mineral rings often form at the waterline, so focus your scrubbing there. For narrow tank openings, a long handled bottle brush works perfectly.
Empty the vinegar solution and rinse the tank with clean water at least three times. Shake and pour between each rinse. Hold the tank up to the light to check for any remaining film or deposits. Repeat the scrub if needed.
How to Clean Small Parts, Nozzles, and Filters
Small components collect buildup fast. Soak the mist nozzle, cap, and any removable trays in a bowl of equal parts vinegar and warm water for 15 to 20 minutes.
Use a toothbrush or cotton swab to clean tiny openings and grooves. Mineral crust inside the nozzle can block mist output, so make sure you clear it completely.
For filters, check your manual first. Some humidifier filters are not designed to be cleaned and must be replaced on a regular schedule. Wicking filters can usually be rinsed under cool water but should not be soaked in vinegar, because the acid can break down the filter material.
If your filter is washable, rinse it gently and let it air dry fully before reinstalling. Never put a damp filter back into the unit. A wet filter promotes rapid mold growth and defeats the purpose of cleaning.
How to Disinfect Your Humidifier After Vinegar Cleaning
Vinegar removes mineral deposits and kills many common mold and bacteria types. However, it is not a hospital grade disinfectant. For a deeper sanitizing step, follow your vinegar cleaning with hydrogen peroxide or a mild bleach solution.
To use hydrogen peroxide, pour enough 3% hydrogen peroxide into the base and tank to coat the surfaces. Let it sit for 15 to 20 minutes. Then rinse thoroughly with clean water.
To use bleach, mix one teaspoon of liquid chlorine bleach per gallon of water. Fill the tank with this solution, let it sit for 20 minutes, and rinse several times until you detect no bleach smell.
Pros of hydrogen peroxide: safe, breaks down into water and oxygen, no harsh fumes. Cons: slightly less effective on heavy mold than bleach. Pros of bleach: powerful disinfectant, kills nearly all pathogens. Cons: strong fumes, requires very thorough rinsing, can damage some plastic parts over time. Never mix vinegar with bleach, as this creates toxic chlorine gas.
How to Rinse and Dry Every Part Properly
Rinsing is just as important as the cleaning itself. Run clean water through every part at least two to three times. Residual vinegar or bleach in the tank will release unwanted fumes or odors into your room when you turn the unit on.
Fill and empty the tank multiple times. Swish water around the base and pour it out. Rinse small parts under running water while gently rubbing surfaces with your fingers to remove loosened debris.
After rinsing, shake off excess water and place all parts on a clean, dry towel. Let everything air dry completely in a well ventilated area. This step may take one to two hours depending on humidity.
Do not reassemble the humidifier until every component is fully dry. Trapped moisture is the number one cause of mold returning within days of cleaning. Patience here saves you from repeating the entire process soon.
How to Prevent Mold and Mineral Buildup Between Cleanings
Prevention is easier than deep cleaning. The simplest step is to use distilled or demineralized water instead of tap water. This eliminates the minerals that cause white dust and crusty deposits.
Empty the tank every day if you are not using the humidifier. Standing water is a breeding ground for bacteria and mold, even overnight. Refill with fresh water each time you turn the unit on.
Keep the area around your humidifier dry. Wipe up any water that collects on surfaces nearby. Point the mist away from walls and furniture to prevent moisture damage and mold growth on those surfaces.
Replace filters on the schedule recommended by your humidifier’s manufacturer. Old, saturated filters lose effectiveness and can harbor mold. A clean filter helps maintain good air quality between your vinegar deep cleans.
How to Clean Different Types of Humidifiers With Vinegar
The vinegar cleaning method works across humidifier types, but each has small differences. Cool mist humidifiers use a wick filter and fan. Focus your cleaning on the base reservoir and replace the wick filter regularly instead of soaking it in vinegar.
Ultrasonic humidifiers use a vibrating disc to create mist. Clean this disc carefully with a soft cloth dipped in vinegar. Do not scrub aggressively, because scratches can reduce mist output.
Warm mist humidifiers boil water to create steam. The heating element collects heavy mineral scale. Soak the base in undiluted vinegar for up to one hour to loosen these tough deposits.
Evaporative humidifiers pull air through a wet wick. The wick absorbs minerals and needs regular replacement. Clean the tank and base with vinegar but handle the wick gently or simply replace it with a new one. Each type benefits from the same vinegar soak and scrub process, with minor adjustments.
How Often Should You Clean Your Humidifier With Vinegar
The Mayo Clinic recommends cleaning your humidifier every three days during active use. This frequency prevents bacteria and mold from reaching harmful levels.
Daily, you should empty the water tank, rinse it briefly with clean water, and refill with fresh water. Every three days, do a full vinegar soak and scrub of the base, tank, and removable parts.
Once a month, add a disinfecting step with hydrogen peroxide or dilute bleach after your regular vinegar cleaning. This monthly deep sanitize catches any pathogens that vinegar alone might miss.
At the end of humidifier season, do a thorough cleaning and let the unit dry completely before storing it. Store the humidifier in a dry place with the tank empty and all caps removed. This prevents mold from growing during the months it sits unused.
How to Troubleshoot Common Vinegar Cleaning Problems
Sometimes the vinegar smell lingers even after rinsing. If this happens, fill the tank with clean water and add a tablespoon of baking soda. Let it sit for 15 minutes, then rinse again. The baking soda neutralizes remaining acetic acid.
Stubborn mineral deposits that resist a 30 minute soak may need a longer treatment. Try soaking in undiluted vinegar for two to three hours or even overnight for extreme buildup.
If your humidifier still smells musty after cleaning, the problem might be inside a component you cannot reach. Check whether the unit has hidden internal chambers that need attention. Consult the owner’s manual or contact the manufacturer.
Pink or orange slime inside the tank is a common type of bacteria called Serratia marcescens. Vinegar can remove it, but you should follow up with a hydrogen peroxide disinfecting step. If the slime keeps returning quickly, increase your cleaning frequency to every other day.
Frequently Asked Questions
How long should I soak my humidifier in vinegar?
Soak the base and tank in white vinegar for 20 to 30 minutes for routine cleaning. For heavy mineral deposits or visible mold, extend the soak to one or two hours. Overnight soaking is safe for extreme buildup but always rinse thoroughly afterward.
Can I run vinegar through my humidifier while it is on?
No. Running vinegar through a powered humidifier can damage the heating element, sensors, and electronic parts. The acid may also corrode internal components over time. Always unplug the unit and soak parts manually instead of running vinegar through the machine.
Is white vinegar safe for all humidifier types?
Yes, distilled white vinegar is safe for cool mist, warm mist, ultrasonic, and evaporative humidifiers. Avoid using apple cider vinegar or flavored vinegars, as they can leave residue and attract bacteria. Stick with plain white vinegar at 5% acidity for the best results.
What is better for cleaning a humidifier, vinegar or bleach?
Vinegar is better for removing mineral scale and light mold. Bleach is stronger for killing bacteria and pathogens. The ideal approach uses vinegar first to descale, then follows with a dilute bleach or hydrogen peroxide rinse to disinfect. Never mix the two solutions together.
Can a dirty humidifier make you sick?
Yes. A dirty humidifier can release mold spores, bacteria, and mineral particles into the air. Breathing this contaminated mist may cause coughing, lung irritation, flu like symptoms, and a condition called humidifier fever. People with asthma or allergies are especially at risk.
How do I remove the vinegar smell from my humidifier?
Rinse all parts with clean water at least three times after cleaning. If the smell remains, soak the tank in water with one tablespoon of baking soda for 15 minutes, then rinse again. Running the humidifier with plain distilled water for a few minutes also helps clear any lingering odor.

I’m Maya Brown, the voice behind Pure Breeze Vault. I write detailed, honest, and easy-to-follow air purifier reviews to help readers compare features, understand filter technologies, and choose products with confidence. My goal is to make research simpler, clearer, and more practical for anyone improving indoor air quality at home.